Run, Bus... RUN!
Run Bus... RUN!
The Plan(s)
As with anything intentionally done, it usually takes several revisions before you get it right. The bus floor plans were no exception. Not only do you have to plan what the layout will be, but the "basement" components need to line up properly, where appropriate, with what's above them.
As I've done before, I tried to create our plans using Adobe Illustrator, using a 1 inch = 1 foot scale. This is probably not the best software for doing such a thing, but it's what I know, and allows for very precise measurement adjustments.
I began by measuring the empty bus as close as possible - down to a quarter inch. Some fudge room had to be allowed, of course, as surely things wouldn't be exactly as planned, once the building started. But, I measured as best as I could. Several revisions were made, of course (such as all the adjustments I
had to make after remembering that all the plywood in the walls had a physical thickness... "Dang, I gotta get another 6 1/2 inches from somewhere... arg!!!"). We even received input from the kids, making their own designs of what they thought the layout of the bus ought to be like. Many good ideas, of course, but it was a bit harder for them to visualize how much space it took to do certain things (such as the toilet just probably wouldn't fit into 12 square inches ;-).
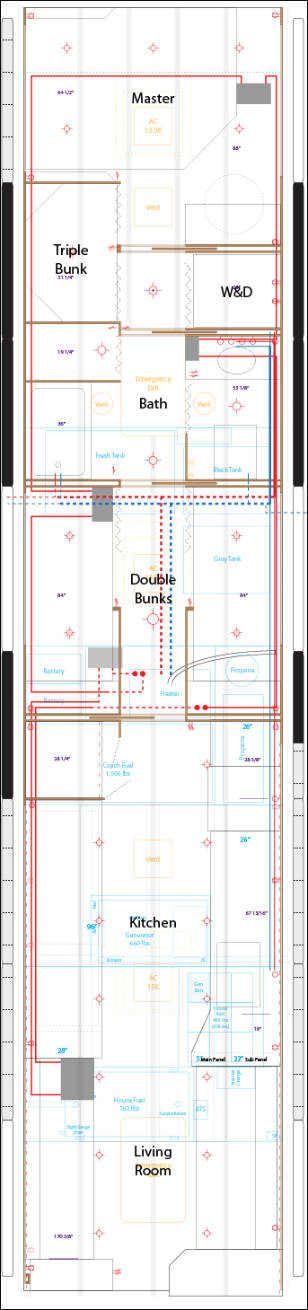
Once we decided on a basic layout (shown, with various layers visible) we put blue painter's tape down on the floor to help visualize how much room there really would be for each designated space. This really helped.
Figuring out the position of the storage bays in "the basement", and the windows, in relation to the desired floor plan was also crucial. Where you put your toilet, for example, is largely dependent upon where you can put your black water tank. Where the shower, bathroom sink, and washer and dryer go somewhat depend on how you plan to run the respective drains to the grey water tank. Even where the batteries and inverter are located is important, as they should be as close as possible to each other, and to the AC breaker panels, etc, etc.
Even though many told me that the additional weight involved in adding the necessary conversion components wasn't an issue at all for the bus... I spent time trying to make it as distributed as possible along the frame. All the water tanks were planned for the 3rd and largest bay. The fresh water tanks total 168 gallons, which adds up to over 1,300 lbs - assuming the grey and black tanks are empty... plus the weight of whatever we have stored in there with them. That's a lot of weight! The fuel tank for the bus engine is strategically located in the middle of the bus, and spans almost the entire width. With it being 192 gallons filled, that's over 1,500 lbs on it's own. Plus the bus batteries (they're heavy), and the "house" batteries (about 570 lbs). The generator we planned to install in the 2nd bay weighs around 650 lbs, and the additional 100 gallon auxiliary fuel tank, planned to fuel the generator and hydronic heater from the first bay, would add yet another 800 lbs when full. So, needless to say, we weren't planning to build a lightweight contender here.... but a fatty instead. Add to all that weight, the additional heaviness of the needed plywood, appliances, beds, cabinets, counters, personal things, etc, and it really started me questioning, "Can this thing really haul all that stuff?!?" We took out the seats (roughly a few thousand pounds), and the racks, and AC-related stuff.... but we sure planned to add a LOT more in. Time to run some numbers.
According to the weight sticker, next to the VIN plate, the 102DL3 series has a GVWR limit of 48,000 lbs. That means, the weight of the bus itself (fuel tank fully loaded), and all it's cargo (passengers, luggage, etc) can't weigh more than 48,000 lbs. I drove it on a scale as a bus (before any demo), and it weighed 35,300 lbs. So, we've got about 13,000 lbs to "play" with. The known weight of the specific components mentioned above (to be added for the conversion), come to roughly 4,800 lbs, leaving around 8,000 lbs for the finished interior of the bus, and whatever personal junk we planned to take with us. I just did a rough calculation on the weight of all the wood sheeting (plywood, OSB, bead board, doors, counters, etc) used in the interior, and I believe it's going to be somewhere in between 2,500 and 3,000 lbs. Not positive, but I think we're good, as we don't have a lot of heavy junk to pack around.
Anyway, as a bus it averaged 7.5 MPG for me on the way home (and I was pushing it). But, as an RV, and especially pulling a second vehicle, we're probably going to see a lot less. Oh well, it's all about the journey, and not how fast (or cheap) we get there, right?
Other Components
Like the overall layout above, I also used a computer to try to conceptualize designs for the other necessary components needed for the conversion (beds, drawers, water tanks and valves, house batteries, etc). Again, sometimes what was actually done didn't follow previously conceived ideas, as measurements differed slightly, or other limits previously unknown became known upon installation. Those plans/illustrations will be shared, along with related photos, in the respective sections.
© Copyright 2017-2026 Run, Bus... Run! (RBR). All rights reserved.